Quick Kitchen Organizing Tip.

/ Wednesday, February 29, 2012 /
Not to long ago I shared with you, how I organized my spices
Want to know what I did with all of those empty spice containers?

Most of them got sent to the garage where I plan on one day using them to organize all of our nails, screws, and other small items. However, the nutmeg and alum tins were just too cute to hide away in the garage. SO instead, they found a new home on our fridge. 


They are perfect for holding pens and pencils. 
These were so easy to make. I just popped the lid off, stuck a couple heavy duty magnets to the fridge, then stuck the tins to the magnets. No gluing required.

 Did you enjoy this post?
Vote for me!


Do you have a crafty or creative tip, trick or tutorial you would like to share with DIY Home Sweet Home readers? Fill out the 'Get Featured' form to submit your ideas. 

Organizing Features

/ Tuesday, February 28, 2012 /
This week is a very busy week for me.
Both kids are getting over a cold, now I think I may be coming down with what they had. I have been drinking green tea with a shot of apple cider vinegar, honey and a splash of lemon juice. A recipe I found online that seemed to work great for Jocelyn. She seemed to really like the stuff and kept asking for more, as for me, I'm having trouble choking it down. However, I'm determined to not get sick so wish me luck.
We also have company coming in this weekend, (another reason why I can't get sick) and we are trying to prepare our walls for paint. 
Speaking of paint... anyone have a suggestion for a green paint that would go well with a butter yellow? 
Looking for something not to bright, no pastels, and no baby poop colors either.  We have been painting patches on our wall trying to find a color we like. So far we have about a dozen different shades and we hate all of them.

Anyways, moving onto another subject... there are some fantastic linkups at More the Merrier Monday this week (the party lasts til Wednesday at midnight so hope on over and link up) and I wanted to share a few that were organizing related.

A Happy Place a Called Home shared some amazing kitchen organizing tips.

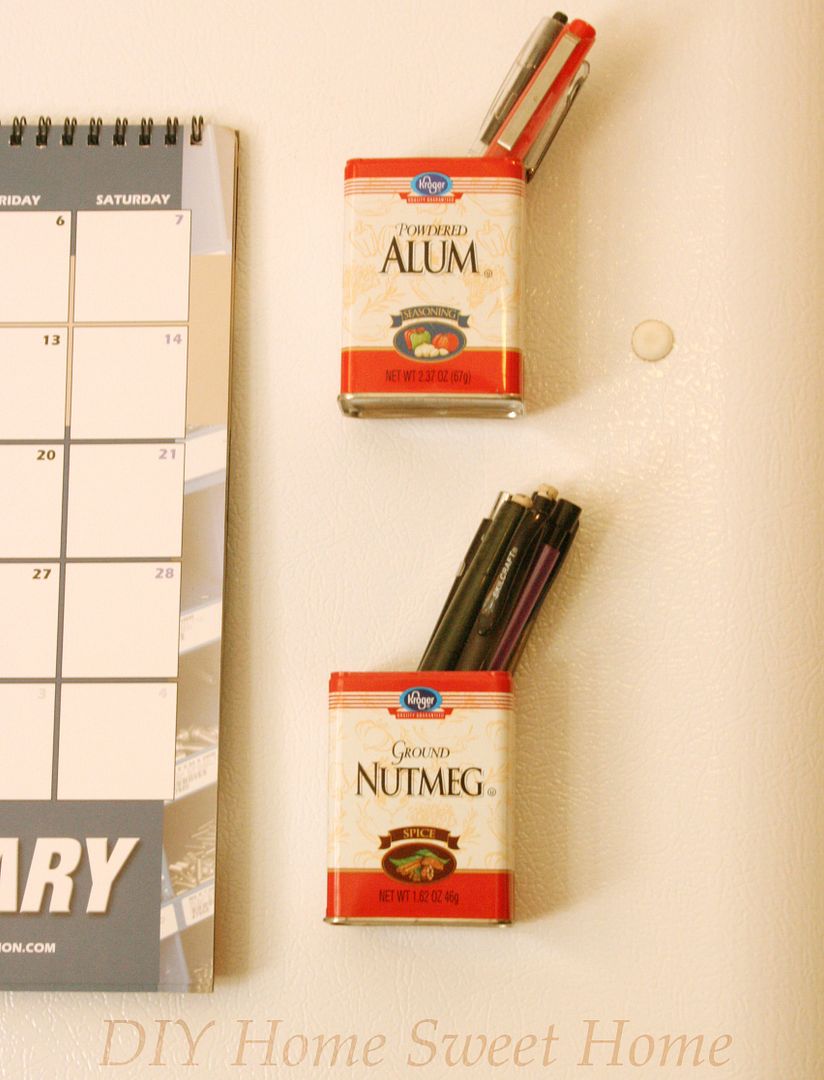
You can find some great tips for controlling cord clutter at Remodelaholic.

The Itsy Bitsy Paper Blog made this very useful tiered stand with dollar store plates.

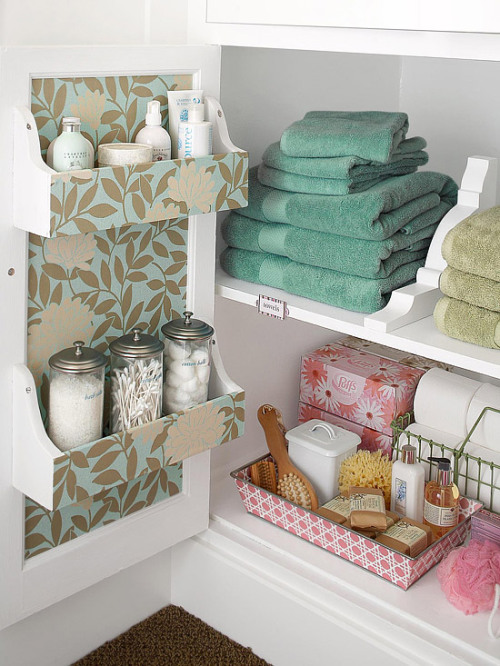
Can you believe that this wall used to be full of ugly, outdated built-ins? That is until Whimsical Perspective gave them a complete makeover.

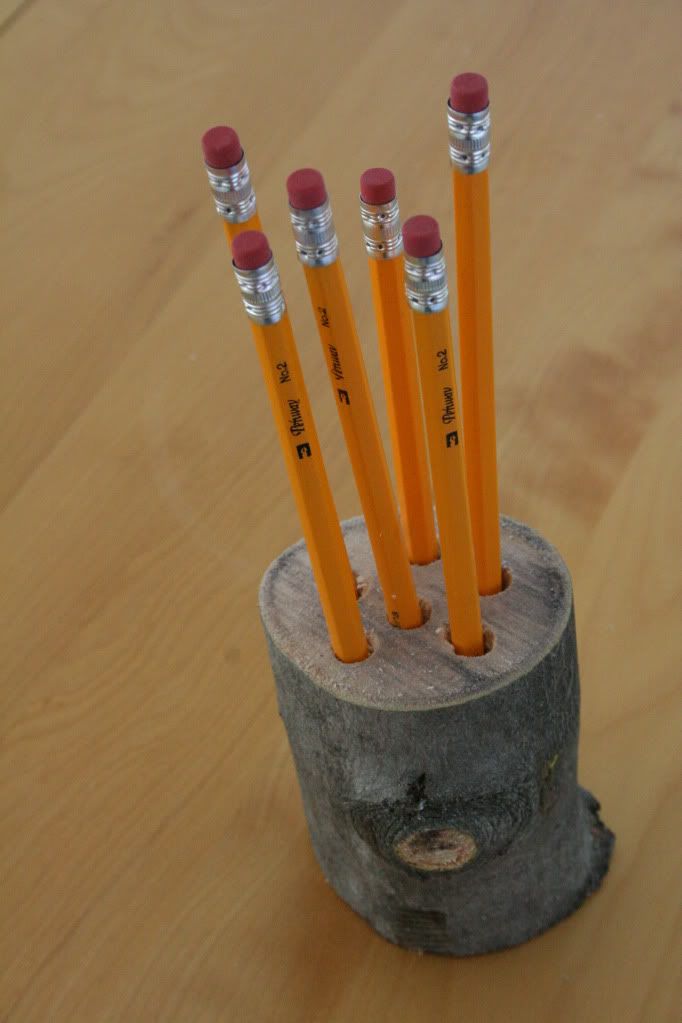
You will find a tutorial to make this amazing log pencil holder at A Law Students Journey. What a great way to organize your pencils in style.

Did you enjoy this post?
Don't forget to VOTE for me!!


Visit Top Mommy Blogs To Vote For Me!


WANTED: Your fantastic tips and tutorials. Please fill out the 'Get Featured' form to share your amazing tips, tricks and crafty projects.
{Link can also be found in the tabs at the top of the page}

Firewood-Picker-Upper-Thing (no-sew)

/ /
Our fire place is the main source of heat in our home. I LOVE it! It keeps our house so warm and toasty, and there is nothing better than starting your day off by enjoying a hot cup of coffee it front of the fire. Or curling up it front of it with the kiddos and a warm cup of hot chocolate before bed.
However, as much as I love our fireplace, there are a few things that I do not like about it. One of those things is the wood. Usually hubby is in charge of gathering the logs from out side and bringing them in. However, Hubby works long hours and I often run out of wood while he is at work (not to mention the fact that after a long 12+ hour shift, the last thing Hubby wants to do is go out in the freezing cold to get some wood)  leaving me with the option to get the wood for myself or freeze to death. Obviously I choose to get the wood myself but, I have short arms and can only carry in a couple logs at a time. This means I have to make several trips in order to get enough logs to last until hubby gets home. A few weeks ago while browsing through Home Depot I spotted an amazing thing. It was a large strip of fabric with two handles, one on each end, used to gather wood. You lay the fabric strip on the ground, pile your logs on top of it, then grab the handles and haul the wood in side. No more scratched up arms. No more trying to balance all the wood one one arm so I can open the door. It was perfect! But there was one problem... It came with a large cast iron log holder and the thing cost $30. I didn't really need the log holder and wasn't about to pay $30 for a strip of fabric. So this is what I came up with.


I took an old fabric shopping bag


Cut off the sides


and VOILA....


It took me about 30 seconds to make and cost $0!! 

 Don't forget to VOTE for me


Visit Top Mommy Blogs To Vote For Me!

Add More Storage to a Small Bathroom

/ Monday, February 27, 2012 /
Looking for More the Merrier Monday? Please click on the More the Merrier Monday tab under the heading above

Our home has been blessed with a ton of bathroom storage. However, I know that many of you are struggling with bathroom storage. Having lived in a few houses that offered little to no bathroom storage, I know how hard it can be. I thought I would share a few tips to making the most of a small bathroom.

1. Shop for tall but slender furniture. A piece such as this billy cabinet found on IHeart Organizing, takes up little floor space while making the most of your vertical space.


2. Hanging a bucket or box from hooks on the wall, like these ones found at BHG.com, can add additional storage without using up any floor space.


3. Take down your towel bar and replace it with a few hooks. Hooks take up less wall space allowing you to hang up more towels or use the extra space for one of the ideas above.

4. Add storage to the inside of you cabinet doors. This will allow you to store items you use often in an easy to find place.


5. Take out a section of your wall and add storage between the the studs. This is a great way to add storage by using up unused space. Use the area to store your toilet cleaning supplies or your shampoos and beauty products.


6. Look up. Adding a shelf above the toilet, door, towels, or bath tub can add a lot of storage space. Be sure to install the storage high enough so that no one will be hitting their head on it.


I would love to hear your tips for adding storage to a small bathroom.
Include them in the comments below or share them at with the
 DIY Home Sweet Home Community

More the Merrier Monday #51

/ Sunday, February 26, 2012 /

Happy Monday!!

Please be sure to check out last weeks features.

Happy Linking!!


If you have been featured
please be sure to grab my button.


Guidelines:
1. Please link directly to your post and NOT just to your blog.
2. PLEASE LINK BACK TO DIY HOME SWEET HOME OR GRAB THE MORE THE MERRIER BADGE.
3. Please Follow DIY Home Sweet Home.
4. Please follow me of Facebook (link on the left)
5. Please visit as many links as you want and leave comments.

DIY Home Sweet Home is teaming up with some wonderful parties.
Please be sure to check them out. 


Other Monday parties:


you are talking too much Photobucket you are talking too much

Don't forget to VOTE for me!!


Visit Top Mommy Blogs To Vote For Me!


FREE Printable - Get your Toddler/Preschooler to Clean their Room

/ Friday, February 24, 2012 /
If you have young kids, I'm sure you have heard all of the excuses:
  1. "I don't know how to" 
  2. "It is clean"
  3. "I cleaned it yesterday"
  4. "But my legs are breaking" (This is Jocelyn's personal favorite)
      One day, in a desperate attempt to get Jocelyn to clean her room, I came up with an idea. I took a piece of paper, divided it into 8 sections, then started drawing pictures of items that made up most of the mess. The first section I drew a shirt and pants to represent dirty clothes, in the second section I drew a teddy bear to represent stuffed animals, and so on, and so on. In the last section I wrote "everything else." I explained to her what each picture was (mainly because I'm terrible at drawing) then I explained that she had to pick up all of the stuff in the first section (dirty clothes) only and put them were they belong. Once she was done with the first section she would get a sticker to place over that section. Then she would move onto the second section.
      After I explained this to Jocelyn, something amazing happened. She cleaned her entire room without any help from me!!! I was actually quite shocked that something so simple was all it took. Dividing the job up onto smaller sections made things a lot easier than looking at the mess as a whole.
      We have since then, upgraded from scribbles drawings on paper to a pretty printable I made.
I know not all of you will be able to use this since your child may have different toys, but I hope it will help out some of you or at least give you an idea to make your own.

Click HERE to print your own copy


       To save on paper I usually peel the stickers off (the ones I have peel off pretty easily) when she is done so we can reuse it the next day. She has never asked to see the paper after she hands it to me so this works for us. You could also place the paper in a plastic sleeve and let your child draw X's over each section with a dry erase marker.


Head on over to the DIY Home Sweet Home Community and share how you get your kids to pick up their toys.

Don't forget to VOTE for me


Visit Top Mommy Blogs To Vote For Me!

Changes

/ Thursday, February 23, 2012 /
I'm sure you have noticed that DIY Home Sweet Home has been under some major renovations.
I've been meaning to make some changes for a while now. However, being the DIY gal that I am, I just couldn't justify paying someone else to do it. After a lot of googling (and a little luck) I managed to come up with something I am pretty happy with. Some of these changes include;


  • A fancy customized header - Now you can search by category using the link at the top of the header. This will enable you to read the posts you enjoy and can bypass everything else. Want some good cleaning tips but could care less about kid or food related posts? Just click on the organizing and cleaning tab to view all organizing and cleaning related posts. ( I'm still working on updating this so a few of the older posts may not show up.)
  • A Favicon - That tiny, little image that pops up next to the page URL and next to the name in the tab. I replaced the ugly blogger favicon with a cute little 'DIY' one.
  • Welcome block and a photo of ME!! - Yay, now you all can see my pretty little face every time you visit. Also, be sure to check out my new 'About Me' page if you haven't done so already.
  • A search bar - Search for anything on this blog


  • A TON of fun ways to stay connected - You can find all of these links in the left sidebar. Check out my favorite, the DIY Home Sweet Home 'Community', where you can all start your own conversations, ask questions, or share YOUR fantastic tips and tutorials. You can also post any questions you have on the DIY Home Sweet Home Facebook page. Go ahead and promote yourself on the community or facebook page, I don't mind (as long as it's family friendly and somewhat relevant to the this blog). My Pinterest Boards are FULL of DIY projects, organizing tips, and a ton of other inspiring ideas.   I'm still trying to figure out Linked in and Linky Friends so please be patient with me.
  • New background - Still not sure if I like it. It seems a little to busy. What do you think?

  • New buttons - The old buttons didn't match the new theme so of course I had to change them too. 
What do you think? I hope you all enjoy it.
 
Copyright © 2010 Home Sweet Home, All rights reserved
Design by DZignine. Powered by Blogger